Yesterday I talked about measuring current. If you missed it you can read it Here.
I briefly mentioned short circuit, but it is important you understand what it is and how to avoid creating one yourself. That way, you will not fry any of your electronics, whether in a car or testing equipment.
What is a short circuit?
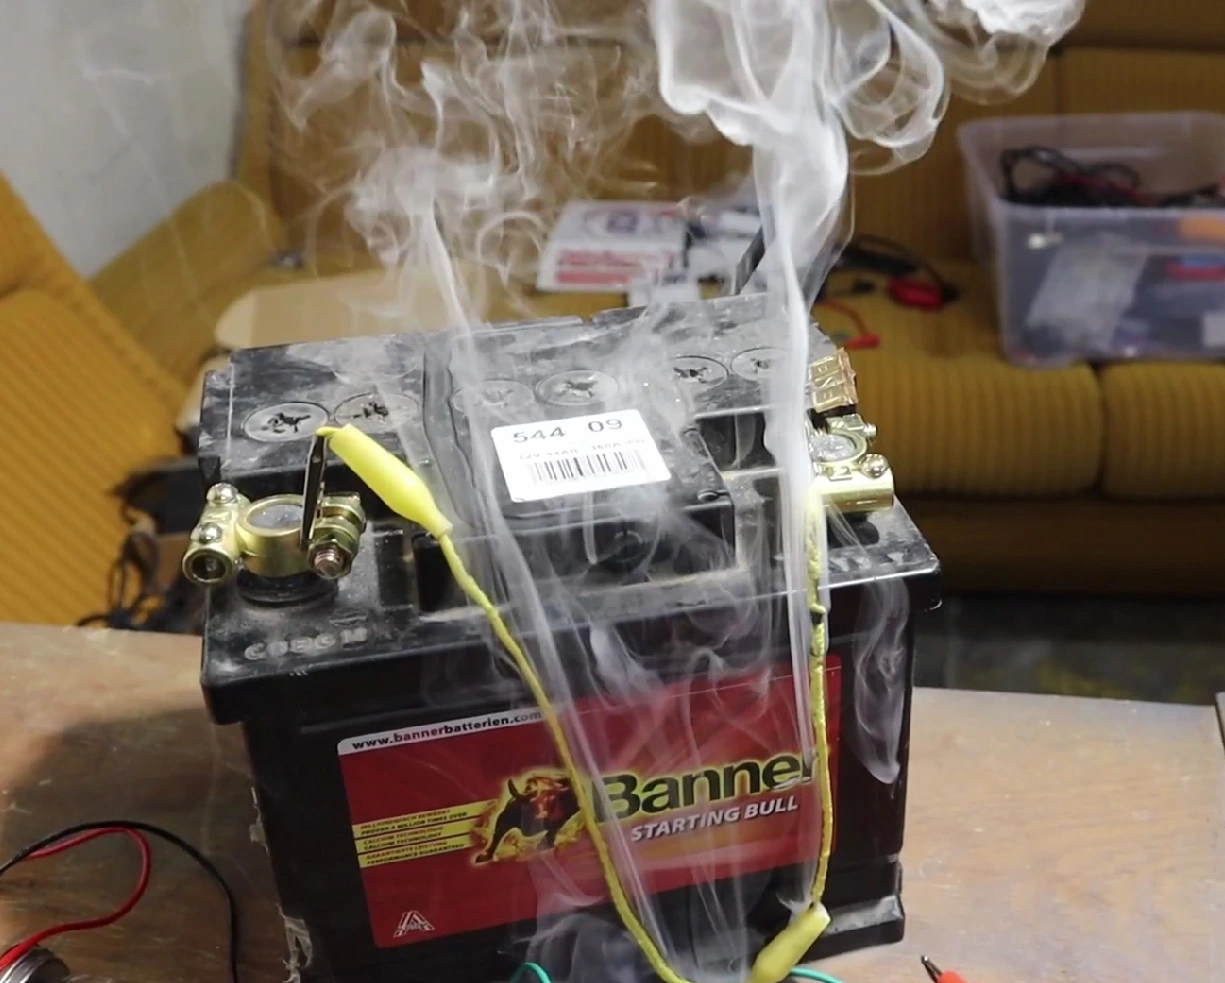
Imagine you have a 12V car battery, and you connect a really thin wire directly from one terminal to the other. Since the wire has super low resistance, like only 0.01 ohms.
It doesn’t really slow down the electric current much at all.
What happens next?
A massive amount of current, say around 1200 amps, rushes through this tiny wire. That’s what we call a short circuit. It’s like giving electricity a shortcut without any roadblocks, causing a big, sudden flow that can be pretty dangerous and heat things up fast!

Remember this to avoid creating short circuit when working on your car:
- Double-Check Your Test Leads: Your multimeter test leads are your connection to the electrical system. Make sure the insulation on them is in good condition, with no cracks or breaks that could expose the metal underneath. Also, ensure the connectors at the ends are firmly attached. Frayed or loose leads are just asking for trouble.
- Be Mindful of Metal Objects: Wrenches, screwdrivers, sockets, even your watch or rings – these are all potential conductors. Keep them away from battery terminals and any exposed electrical connections while you’re working. It’s easy to accidentally bridge a connection with a tool and create a short.
- Use the Correct Settings on Your Multimeter: Before connecting your test leads to anything, make sure your multimeter is set to the correct measurement type (voltage, current, resistance) and the appropriate range. Trying to measure current when your meter is set to voltage, for example, can create a low-resistance path and potentially cause a short circuit within the meter itself (and maybe even damage it!).
- Understand What You’re Measuring: Don’t just poke around randomly! Have a clear idea of what you’re trying to measure and where you need to connect your test leads. Refer to your car’s wiring diagrams or a reliable repair manual if you’re unsure. Connecting your meter across the wrong points can easily lead to a short.
- Isolate Components When Possible: If you’re working on a specific component or circuit, try to isolate it from the rest of the system if possible. This might involve unplugging connectors. Isolating the circuit you’re testing minimizes the risk of accidentally shorting something else.
- Take Your Time and Don’t Rush: Electrical work requires focus and attention to detail. Rushing increases the chances of making a mistake, like accidentally touching two terminals with a tool or a test lead. Take a deep breath and work methodically.
- If Something Doesn’t Look Right, Stop! If you see sparks, smoke, or anything unusual, immediately disconnect the power source and reassess the situation. Don’t try to force things or ignore warning signs.
By following these simple precautions, you can significantly reduce the risk of accidentally creating a short circuit and keep your DIY adventures safe and enjoyable. Remember, electricity is powerful, so respect it and take your time!
P.S. The Extended version of this email course, including 60 video lessons to help you master DIY diagnostics, is available HERE.

Hi, I am Juraj “Yuri” Lukacko. I got frustrated by unhelpful and scammy mechanics, so I decided to learn everything about car diagnostics myself. I test dozens of new car diagnostic tools every month along with learning new strategies to fix and customize cars. About Juraj Lukacko (Yuri)